Picture this: a cozy corner of your home furnished with a rustic coffee table, a sleek bookshelf, or even a comfy outdoor bench—all crafted by your own hands from something as humble as a wooden pallet. What if these pieces didn’t just look good but also told a story of sustainability, creativity, and resourcefulness? That’s the beauty of DIY pallet furniture. In a world where eco-conscious living is more important than ever, turning discarded pallets into functional, stylish pieces is a win for both your home and the planet.
This article will guide you through the process of making your own pallet furniture, from sourcing materials to adding the final touches. You don’t need to be a woodworking pro—just a willingness to experiment and a few basic tools. Along the way, you’ll learn practical steps, clever design ideas, and the sustainable benefits of this DIY trend. By the end, you’ll be ready to transform your space with furniture that’s as unique as it is earth-friendly. Let’s dive in!

Why Pallet Furniture Fits a Sustainable Lifestyle
Pallets—those wooden platforms used to ship goods—are often overlooked, but they’re a treasure trove for DIY enthusiasts. Here’s why they’re perfect for sustainable home projects:
-
- Upcycling at Its Best: Instead of buying new furniture made from freshly cut trees, you’re giving a second life to materials that might otherwise end up in landfills.
-
- Low Cost, High Impact: Pallets are often free or inexpensive, making this a budget-friendly way to furnish your home.
-
- Customizable Charm: Their raw, rustic look can be tailored to any style—modern, farmhouse, or bohemian—with a little creativity.
-
- Eco-Friendly Footprint: By reusing pallets, you’re reducing demand for mass-produced furniture and cutting down on waste.
Beyond the environmental perks, building with pallets is a chance to flex your creative muscles and make something truly yours. Ready to get started? Let’s gather what you’ll need.
Step 1: Sourcing and Prepping Your Pallets
The foundation of your project is the pallet itself, so let’s start with how to find and prepare them.
Where to Find Pallets
-
- Local Businesses: Check with warehouses, hardware stores, or small retailers—they often have extras they’re happy to give away.
-
- Online Marketplaces: Sites like Craigslist or community groups might list free or cheap pallets.
-
- Construction Sites: With permission, you might score some from ongoing projects.
Tip: Look for pallets marked “HT” (heat-treated), which are safe and chemical-free, unlike those treated with toxic preservatives.
Prepping Your Pallets
-
- Inspect: Check for cracks, splintered wood, or protruding nails. Avoid anything too damaged.
-
- Clean: Brush off dirt and rinse with soapy water. Let them dry thoroughly to prevent mold.
-
- Sand: Use medium-grit sandpaper (80-120) to smooth rough spots and edges. This makes them safer to handle and ready for finishing.
-
- Disassemble (Optional): If your design requires planks, pry apart the pallet with a crowbar or hammer. Keep nails for rustic flair or remove them for a cleaner look.
With your pallets prepped, you’re set to build. Let’s talk tools and safety next.
Step 2: Tools and Safety Essentials
You don’t need a workshop full of gear—just a few basics to get the job done safely.
Essential Tools
-
- Hammer and Crowbar: For disassembling pallets.
-
- Sander or Sandpaper: To smooth surfaces.
-
- Drill and Screws: For sturdy assembly (screws hold better than nails long-term).
-
- Saw: A handsaw or jigsaw works for cutting planks to size.
-
- Measuring Tape and Pencil: For precision cuts and layouts.
-
- Paintbrush or Roller: For finishing touches like paint or sealant.
Safety First
-
- Gloves: Protect your hands from splinters.
-
- Safety Glasses: Shield your eyes while cutting or sanding.
-
- Dust Mask: Avoid inhaling sawdust.
-
- Work in a Ventilated Space: Especially when painting or staining.
With your toolkit ready and safety covered, it’s time to pick your project.
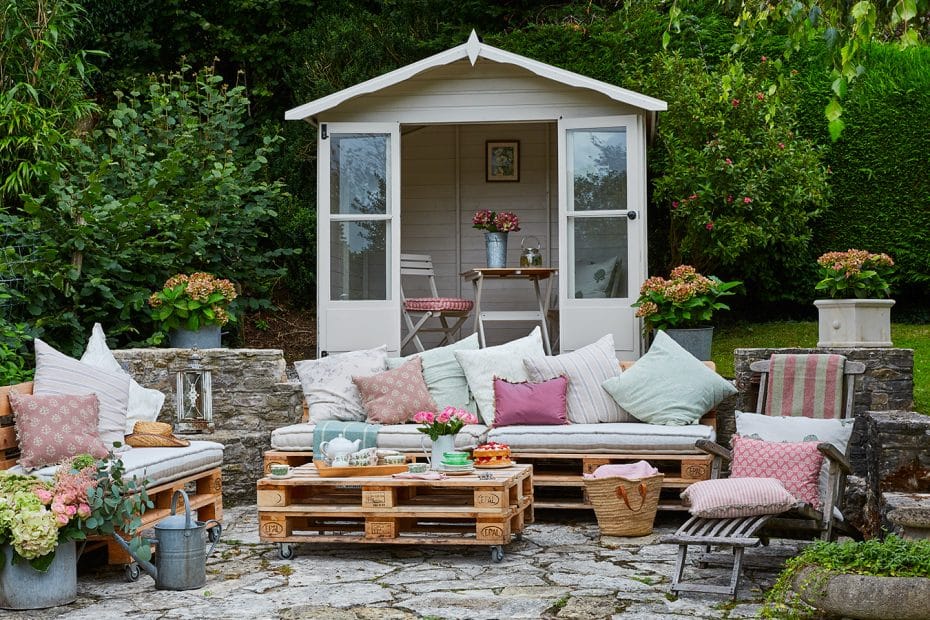
Step 3: Building Your First Pallet Piece
Let’s walk through a beginner-friendly project: a pallet coffee table. This is versatile, manageable, and a great starting point.
Materials
-
- 2-3 wooden pallets
-
- Screws or wood glue
-
- Sandpaper
-
- Optional: paint, stain, or wheels (casters)
How to Make It
-
- Base Setup: Stack two pallets on top of each other for height, or use one for a lower profile. Align them evenly.
-
- Secure It: Drill screws through the top pallet into the bottom one at each corner and along the sides for stability. If using glue, apply it between layers and clamp until dry.
-
- Smooth the Top: Sand the top surface thoroughly—it’s where drinks or decor will sit, so make it splinter-free.
-
- Add Legs (Optional): Flip the table and attach four caster wheels with screws for mobility, or use pallet scraps as short legs for a rustic lift.
-
- Finish: Paint it a bold color, stain it for a natural wood look, or seal it with polyurethane for durability. Let it dry completely.
This table can grace your living room or patio with minimal effort. Want more ideas? Keep reading.
Step 4: More Pallet Furniture Inspirations
Once you’ve mastered the basics, try these projects to expand your sustainable home:
Pallet Bookshelf
-
- How: Cut a pallet in half lengthwise, sand it, and mount it to the wall with brackets. Add planks from another pallet for extra shelves.
-
- Use: Perfect for books, plants, or photo frames.
Pallet Outdoor Bench
-
- How: Use one pallet as the seat, another cut into sections for the backrest. Attach with screws and add cushions for comfort.
-
- Use: A cozy garden or porch seating option.
Pallet Bed Frame
-
- How: Arrange 4-6 pallets in a rectangle to fit your mattress size. Secure them together and sand the edges. Add a headboard from pallet planks if desired.
-
- Use: A minimalist, eco-chic bedroom upgrade.
Each piece showcases the pallet’s raw beauty while serving a purpose. Now, let’s polish them up.
Step 5: Finishing Touches for Style and Durability
A great finish turns your project from “DIY” to “wow.” Here’s how to elevate your pallet furniture:
-
- Paint: Bright colors like teal or mustard add personality. Use outdoor paint for weatherproofing if it’s going outside.
-
- Stain: Highlights the wood grain for a warm, natural vibe. Choose a shade like walnut or oak.
-
- Sealant: A clear coat (matte or glossy) protects against spills, sun, or rain. Apply two layers for longevity.
-
- Details: Add cushions, knobs, or hooks to personalize it further.
Test your finish on a scrap piece first to ensure you love the look. With this, your furniture is ready to shine.
The Rewards of Pallet Furniture
Building with pallets isn’t just about the end result—it’s about the journey. You’re reducing waste, saving money, and crafting something that reflects your style. Each scratch or knot in the wood tells a story of reuse and resilience. Plus, you’ll feel the pride of saying, “I made that,” every time you sit, sip, or store something on your creation.

Start Your Sustainable DIY Adventure
Pallet furniture is your ticket to a home that’s stylish, sustainable, and uniquely yours. Start small with a coffee table or go bold with a bed frame—the possibilities are as endless as your imagination. Gather your pallets, grab your tools, and let your creativity flow. The planet will thank you, and your home will glow with the charm of handmade beauty. Ready to build? Your sustainable masterpiece awaits!